
Introduction to CleanMyMac X
CleanMyMac X is a popular macOS cleaning and optimization tool. Developed by MacPaw, it is designed to help users free up disk space, improve system performance, and maintain their Mac running smoothly. CleanMyMac X scans your computer for potential junk files, outdated caches, and unnecessary system logs, freeing up valuable storage space and enhancing your Mac’s performance. Additionally, CleanMyMac X comes with other features such as malware removal, privacy protection, and optimization tools to keep your Mac in top shape.
However, despite its numerous benefits, some users may find that CleanMyMac X is not the right tool for them. This could be due to incompatibility with other applications, personal preferences, or simply wanting to try out a new cleaning tool. In such cases, users may wish to uninstall CleanMyMac to free up system resources or simply declutter their application library.
Reasons to Uninstall CleanMyMac X
There are various reasons why one might choose to uninstall CleanMyMac X from their system. Some users may find that the application is not working as expected or that it causes conflicts with other software on their Mac. Others might have concerns about privacy or data security, as CleanMyMac X requires access to system files to perform its cleaning functions.
Another reason to uninstall CleanMyMac X is that users may discover alternative cleaning applications that better suit their needs or preferences. With numerous competitors on the market, it’s not uncommon for users to try out different software before settling on the one that best suits their requirements. Additionally, some users may need to uninstall CleanMyMac X temporarily to troubleshoot issues or reinstall the software to fix bugs or glitches.
I personally love CleanMyMac X and have never had any issues with it. Click here to read my CleanMyMac X review.
Preparing for the Uninstallation Process
Before proceeding with the uninstallation process, it’s essential to ensure that you have backed up your important data and files. This is because the uninstallation process will involve deleting some files and folders associated with CleanMyMac X, which could potentially lead to data loss if not done correctly.
Once you have backed up your data, close all running applications, including CleanMyMac X. To do this, right-click on the CleanMyMac X icon in the Dock and select “Quit.” This will ensure that the application is not in use, making it easier to remove from your system.
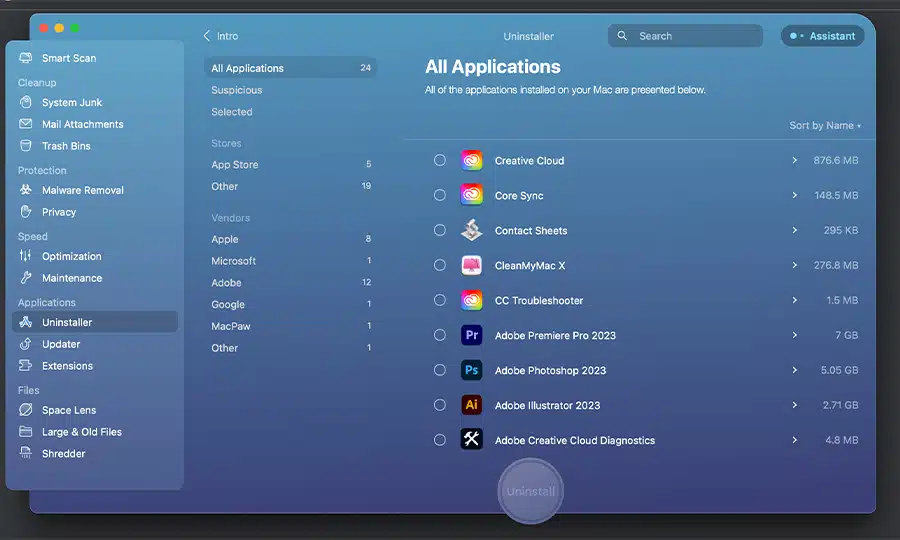
How to Uninstall CleanMyMac X: Step-by-step Guide
- Open CleanMyMac X: Launch the CleanMyMac X application if it is not already open. You can do this by clicking on the CleanMyMac X icon in the Dock or searching for it using Spotlight.
- Access the Uninstaller: In the CleanMyMac X menu, click on the “Uninstaller” tab. This will display a list of all installed applications on your Mac, including CleanMyMac X.
- Select CleanMyMac X: Scroll through the list of applications and locate CleanMyMac X. Click on the checkbox next to the application’s name to select it for uninstallation.
- Uninstall CleanMyMac X: Click on the “Uninstall” button at the bottom of the window. CleanMyMac X will then begin the uninstallation process, removing all its files and folders from your system.
- Restart your Mac: Once the uninstallation process is complete, it’s a good idea to restart your Mac to ensure that all traces of CleanMyMac X have been removed.
Manual Removal of CleanMyMac X Files
In some cases, the standard uninstallation process may not remove all files associated with CleanMyMac X. To ensure the complete removal, you can manually delete any remaining files and folders.
- Open Finder: Click on the Finder icon in the Dock to launch a new Finder window.
- Access your Library folder: In the Finder menu, click on the “Go” menu and hold down the “Option” key on your keyboard. This will reveal the hidden “Library” folder in the drop-down menu. Click on “Library” to access it.
- Search for CleanMyMac X files: In the Library folder, search for any files or folders related to CleanMyMac X. These may include folders named “CleanMyMac X,” “MacPaw,” or “com. MacPaw.CleanMyMac.” Delete any files or folders you find related to CleanMyMac X by dragging them to the Trash.
- Empty the Trash: To permanently remove the deleted files and folders from your system, right-click on the Trash icon in the Dock and select “Empty Trash.”
Alternative Methods to Uninstall CleanMyMac X
If you are unable to uninstall CleanMyMac X using the standard method or prefer to use a different approach, there are alternative methods available.
- Using AppCleaner: AppCleaner is a free application that helps you remove unwanted applications and their associated files from your Mac. Download and install AppCleaner, then drag the CleanMyMac X icon from the Applications folder into the AppCleaner window. AppCleaner will then locate all associated files and allow you to remove them with a single click.
- Using Terminal: For advanced users who are comfortable with command-line tools, it is possible to uninstall CleanMyMac X using Terminal. Open Terminal and enter the following command:
sudo /Applications/CleanMyMac\ X.app/Contents/Resources/CleanMyMac\ X\ Uninstaller.app/Contents/MacOS/CleanMyMac\ X\ Uninstaller –cleanmymac-uninstall
Press “Enter” and follow the on-screen prompts to complete the uninstallation process.
How to Ensure Complete Removal of CleanMyMac X
After uninstalling CleanMyMac X, you should verify that all associated files and folders have been removed from your system. To do this, search your Mac for any remaining files or folders related to CleanMyMac X or MacPaw. You can use Finder’s search function or a third-party search tool such as EasyFind.
If you find any lingering files or folders, delete them by dragging them to the Trash and emptying the Trash. This will ensure that all traces of CleanMyMac X have been completely removed from your system.
Common Issues and Troubleshooting During Uninstallation
During the uninstallation process, you may encounter some issues or errors. Some common problems include:
- CleanMyMac X not appearing in the Uninstaller list: If CleanMyMac X does not appear in the list of applications when using its built-in Uninstaller, try restarting your Mac and attempting the process again. If the issue persists, use an alternative method to uninstall CleanMyMac X.
- Error messages during manual removal: If you encounter error messages or are unable to delete certain files or folders during the manual removal process, ensure that you have the necessary permissions to modify and delete the files. If necessary, right-click on the file or folder, select “Get Info,” and modify the permissions in the “Sharing & Permissions” section.
- Missing Library folder: If you cannot locate your Library folder to manually remove CleanMyMac X files, ensure that you are holding down the “Option” key while clicking the “Go” menu in Finder. This will reveal the hidden Library folder.
Reinstalling CleanMyMac X (optional)
If you have uninstalled CleanMyMac X but later decide you want to reinstall it, simply download the latest version from the MacPaw website and follow the installation instructions. You can also reinstall CleanMyMac X from your Mac App Store account if you previously purchased it from there.
Before reinstalling CleanMyMac X, it’s important to ensure that all remaining files and folders associated with the previous installation have been removed. This will prevent any conflicts or issues during the reinstallation process. Use one of the methods outlined in this article to ensure complete removal of CleanMyMac X before reinstalling it.
Conclusion and Final Thoughts
Uninstalling CleanMyMac X can be a straightforward process if you follow the steps outlined in this article. Whether you are looking to try out a new cleaning tool, experiencing issues with CleanMyMac X, or simply want to free up system resources, the uninstallation process can be done quickly and easily.
Remember to back up your important data before uninstalling CleanMyMac X and ensure that all associated files and folders have been removed to prevent any potential conflicts during future installations.
If you encounter any issues during the uninstallation process or have any questions, don’t hesitate to reach out to MacPaw’s support team for assistance. With a little bit of preparation and the right approach, you can successfully uninstall CleanMyMac X from your system and move on to the next cleaning tool that best suits your needs.

